I keep hearing and reading that, as a photographer, I need to develop my style. Particularly if I wish to be successful. The question is, why?
I don’t subscribe to this on so many levels. Consistency though, now that’s a different matter altogether.
Photographic techniques with a camera
I keep hearing and reading that, as a photographer, I need to develop my style. Particularly if I wish to be successful. The question is, why?
I don’t subscribe to this on so many levels. Consistency though, now that’s a different matter altogether.
Following on from the article I wrote earlier about my Fashion in the City shoot last weekend, I thought it might be fun to demonstrate just how much post processing I’d done to some of the images.
For the most part I do a very light retouch and generally spend only about 2 to 3 minutes on an image. There are excpetions to this of course, particularly where I’m going for a more dramatic look or where the image requires a lot of cleanup. An example of the latter might be for a beauty shot where the model’s complexion might need some attention or there are extraneous hairs that need to be removed. Essentially, for this type of shot anything that can detract from the beauty of the image needs to be worked on. Unless it is a permanent feature and is supposed to be there of course. Sometimes however I might spend a little longer on an image and the examples shown below vary from one extreme to another.
The “Before” image in each of the cases below is literally straight off the camera. I’ve not done any post processing to the image at all apart from a conversion to an 8-bit colour depth and a slight sharpen for screen during the export from Lightroom. That’s it. Nothing else. As you can see in all cases, the images are cold, “flat”, lacking contrast, vibrancy and depth. There simple isn’t any punch or impact. Nothing to hold the gaze of the viewer for that split second longer.
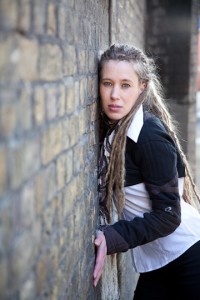
This first image has had very little post processing done to it at all. I gave it a slight boost in Lightroom before exporting it to Photoshop CS3 where I did a little noise reduction, tidied it up a bit, added a contrast adjustment and did a little burning to darken the corners.
Total edit time about 3 minutes.


Following on fom my previous posts here and here about in-field backup and in particular the solution I have opted for, today I had the opportunity of testing it out in anger.
As I write this post, I’ve just returned from a day shooting Big Cats in deepest, dakest Kent. And I really do mean “deepest” and “darkest” owing to the weather.
With freshly charged NiMH batteries, a stack of compactflash cards and two bodies I proceeded to put the device through its paces. After each shooting session I swapped the cards and backed them up onto the drive. It isn’t the fastest solution but it worked admirably, even when I went out for the final session of the day and had the unit backing up whilst in my pocket. The cards from the final shoot I backed up in the car during the journey home. It performed faultlessly throughout the day.
I did discover one unforeseen benefit of using this device, and that is the ease by which the images can be loaded into Lightroom. Plugging thebackup drive into the PC allowsall the images from the day to be imported and processed in one go rather than having to swap out the media cards.
This suits my workflow very well as I rely on the import processing capabilities of Lightroom quite heavily…
Getting back to the topic of this post, I would say that today has proved a great success. I’m still a little nervous of losing battery power but I can work around that and with two drives the risk if a total failure is somewhat mitigated.
…you need to try something different. Obvious when you think about it, isn’t it?
For a while now I’ve been wanting to create a different look for some of my images, particularly when I’ve been working with models. It is often very easy to get carried away with the moment and just fall back on the usual routine. Nothing wrong with that, but if you want a different look, you need to break with tradition and push yourself beyond the comfort zone.
When I took the wedding seminar course back in October last year they really pushed me to try something new. “Forget the flash” they said, “you won’t need it. Shoot wide open and push the ISO.” I tried it and got some great shots in almost low light. Noise aside, the images all appeared a little on the soft side. Nothing wrong with that, particularly for wedding shots as a softer image works well here. I think so anyway. This won’t work for all occasions though as was very evident on the fashion shoot last weekend. To get a more edgy, gritty look to the images I had to try something different. Quite different in fact.
This felt very uncomfortable at first but with a little practice it became second nature and very easy to set up. The images were great and had a very different look and feel to the wedding shots. Crisper, grittier and edgier.
Am I glad I stepped outisde of the box to try something new? You bet I am.
NOTE – The images in this post are virtually straight off the camera with little or no post processing and are therefore not necessarily representative of the finished article.
Had a fantastic shoot this afternoon and got to try out some off-camera flash techniques that I’d been itching to have a go at for a while now.
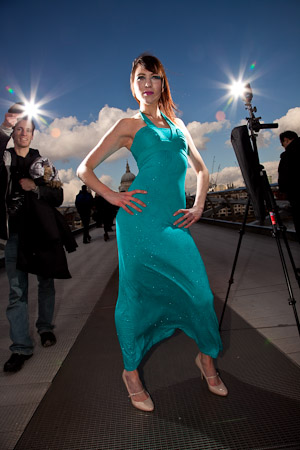
Here is a sneak preview of some of the images. None of them have had any post processing work apart from a very light adjustment in Lightroom. The images themselves were all shot with a mixture of on-camera and off-camera flash: on-camera fill set relatively low and two off-camera side lights, one each side and slightly behind the subject pointing forwards. The overall effect is similar to the one perfected by Joel Grimes and gives a great look to the images. The harsh, 3D lighting really makes them “pop”. A quick lightroom adjustment for white balance, black level, vibrance, clarity and contrast helps bring them along a little further. Can’t wait to get them through photoshop.
The first image in this set, featuring the model Jade, shows how the two side lights were positioned. This was taken on the Milenium Bridge and was backlit by a very bright sky. There are actually two exposures going on here: flash and ambient. The flash exposure is controlled by the flash power, aperture and the duration of the flash burst. The ambient is controlled by the aperture and the shutter speed. Dialing up the flash power (i.e. adding more light from the flash) requires the aperture to be reduced which in turn will reduce the exposure of the ambient. For this shot, the flash was dialed up above the ambient to under expose and therefore allow for a richer saturation of the sky whilst simultaneously reducing the brightness of the clouds. The smaller aperture also adds the starburst effect from the two flash guns. If you don’t believe me, try it. Continue reading Fashion in the City – a sneak preview… »