
Do you want to learn how to instantly improve your pictures? Have you ever wondered why some photographers’ images just look so real? This article is for you.
How to instantly improve your photos…
What would you say if I told you there is a magic button on your camera? A magic button that will instantly improve your pictures. A magic button that will make the colours in your camera so much more real and lifelike?
Well, there is. Only it’s not called the magic button, it’s called “white balance” and it’s really simple to use. Many photographers won’t change their camera’s white balance for fear of being unable to recover its original settings. Some worry they’ll forget to change it back and still more don’t even know what it does.
In this article I’m going to dispel a few myths and get you to step outside your comfort zone. I’m also going to keep it light and non-technical so stay with me and hopefully you’ll learn something along the way.
Myth – If I change my camera’s white balance I’ll never get it back again.
This is totally untrue. With most digital cameras all but two white balance settings are presets. They’re hard coded into the camera and although you can switch from one setting to another, you can’t alter the settings themselves. The two you can change are Custom White Balance and Kelvin and we’ll cover them in a later article.
What does white balance do? Why do we need to change it?
Very simply put, the white balance adjustment in a digital camera changes the way he camera sees different types of light. The light inside a building a very orange and the light outside is very blue. Humans don’t really notice it because the brain is very good at making its own white balance adjustment. That’s why if you look at a piece of white paper inside it looks white and if you take it outside it looks white also. BUT, if you take a picture of the paper inside it will appear orange whereas outside it will appear white. What we have to do as photographers is be aware of this difference and make the white balance adjustment.
Have you ever looked at your pictures and wondered why they look orange? Or grey? Or green? Or blue? (Click to Tweet)
Have you ever looked at your pictures and wondered why they look orange? Or grey? Or green? Or blue? It’s usually very subtle and to the untrained eye it can be hard to notice. Your brain will tolerate it and still interpret the scene correctly. With the correct white balance you’ll notice a huge difference. The colours will all ping into place and your images will look significantly better for it.
How does the camera do it? In a digital camera the adjustment is performed by software by applying a colour temperature offset to each pixel. (Note, if you shoot in JPG this offset is written to each pixel in the file; if you shoot in RAW the offset is applied during post-processing making it much easier to change later)
How do I know how to set the white balance?
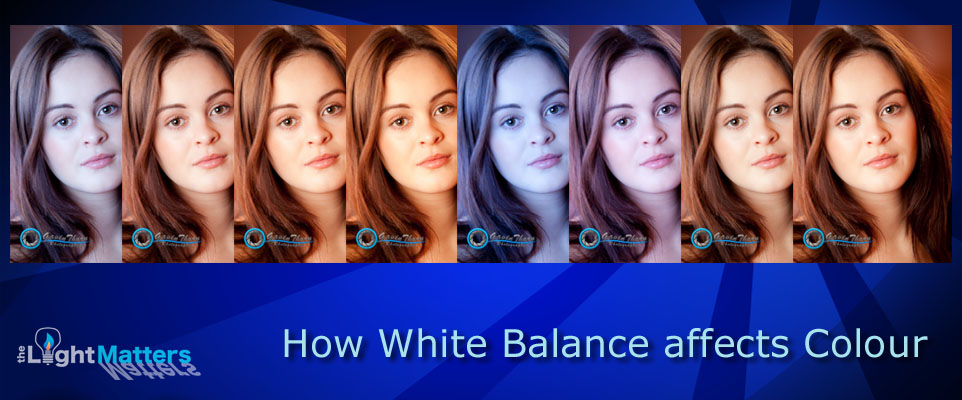
When setting the white balance on your camera, the best place to start is from the ambient light in the scene. Ask yourself, “what is the predominant light source?” It will generally fall into one of several categories: Daylight, Shade, Overcast/cloudy day, Tungsten filament light bulb or Fluorescent tube. The sequence of images below show the differences between the various white balance settings for a single image.


Top row, left to right: Cloudy, Daylight, Flash


Bottom row, left to right: Fluorescent, Shade, Tungsten
Which setting is correct can be very subjective! Some settings will be definitely wrong whereas others will be very close. These images were taken on an overcast, cloudy day. The subject was in her living room with tungsten lighting and wood panelled walls. The room itself was very “orange” and she was lit with studio flash.
It was a smorgasbord of different colour lighting from cold daylight to warm tungsten. When making this frame I actually used the “Flash” (top right) white balance setting because I’d set my exposure such that flash was the predominant light in the scene as far as the camera was concerned. This is a neat trick when working with multiple light sources with different colour temperatures – the flash can be used to clean up the colours. In this situation the “Flash” white balance setting gave better skin tone. Daylight is also very close and would have worked just as well. The “Cloudy” and “Shade” settings gave an orange cast to the skin tone.
“Tungsten” and “Fluorescent” whilst both being blatantly wrong actually gave an interesting colour effect.
Can’t I just leave my camera on the “Auto” setting?

I, personally, don’t like to use the Auto white balance setting for two reasons.
Firstly the colour balance can and will change from frame to frame. This isn’t good if you want consistent results. It introduces an uncontrolled variable into your photography. Manually setting the white balance according to the light in the scene locks it in for every frames making it much easier to spot other issues.
Secondly, I don’t have a lot of faith in the camera’s software getting it right, especially when working with flash.
Exercise for the reader
Over to you – your mission for this article is of a 3-fold nature:
Ex 1 – Find out how to set your own camera’s white balance
Before you can play with white balance, you need to know how to set it. Have a look at your camera’s controls and dig out the manual if necessary. Find out where and how to set the white balance and how practice switching between the various settings.
Ex 2 – Try it out
Now you know how to set it, try it out under different lighting conditions. Try it inside with, say, tungsten lights. Set the camera to tungsten (usually depicted by a light bulb) and take a picture. Now try it with each of the other settings in turn. Once you’ve done that, go outside and set “Daylight.” Make a frame then try each of the other white balance settings in turn.
Ex 3 – Look at the results
When you’re done, upload the images to your PC/Mac and have a look at the results. Work out which setting you think works best for different lighting conditions.
Conclusion
Setting the white balance correctly for the scene can and does make a huge difference to the colours in your final image. I almost always set it manually these days or go one step further and set a custom white balance, but that dear reader is the subject of a future post.
I should also mention that when you start to look more closely at colour, particularly making sure you obtain good colour, you need to work with a calibrated display. It too can make a huge difference as I’ve found that most PC screens are generally quite cold which again will alter your perception of colour. If you want to get really greay colour you’ll need to work with a cully calibrated system from capture to output. That, again, will be the subject of a future post.
That’s it for this article. I’d love to hear your thoughts about these images. In particular which image above has the best white balance setting. Leave a comment below and let me know (don’t forget to say whether your monitor is calibrated or not).


What is your recommendation for two situations: 1. Twilight shot . Long exposure using ND filters is a variation of this. 2. Night outdoor photography with city lights.
Hi Ravi,
White balance should always be set according to the dominant light source in the scene. ND filters are colour neutral and only attenuate it rather than add a colour cast.
City lights often don’t have a full colour spectrum and add a very heavy colour cast, usually orange or green depending on which type. This makes them difficult to work with and get reasonable colour. One trick a lot of photographers use is to shoot monochrome, especially under sodium street lights.
If you really want to shoot in colour the best thing to do would be try different settings and see which works best for you. If there isn’t a preset that does the job you can always dial in a Kelvin value manually or shoot a grey card and use it to create a custom white balance setting for that particular scene and light. Most modern DSLRs have this feature, it’s just a question of finding it in the manual.
Hope that helps,
Gavin