First things first, Aperture Priority is your ‘go to’ mode for almost all your photos. It’s the mode I use all the while unless…
- Time is an important element of the image
- I’m using studio flash
- I’m in a situation that demands or requires full control over the camera
If you use the fully automatic mode (green rectangle on most DSLRs) at the moment, I’d encourage you to switch over to Aperture Priority (Av on Canon or A on Nikon) for a while at least and see how you get on.
If you do, leave a comment below and let me know how you got on. I’d love to hear your feedback.
What is Aperture Priority?
Aperture Priority is a semi-automatic shooting mode. Don’t be put off by that, it simply means as you change one setting, the aperture, your camera works out all the rest for you to give you a good exposure.
Think of it as a see-saw. As you change the aperture, the see-saw will either tip up or down and your camera changes the shutter speed to make it level again.
How do you know what aperture to set?
Aperture, or Lens Aperture to give it it’s correct name, refers to the size of the hole inside your lens that lets light through to the film or sensor. Changing the aperture changes the size of the hole allowing more light (bigger aperture) or less light (smaller aperture) through. Your camera is aware of this and adjusts the shutter speed accordingly to give you the correct exposure.
- Big hole = more light, needs less time and therefore a faster shutter speed.
- Small hole = less light, needs more time and therefore a slower shutter speed.
As a photographer using Aperture Priority mode, you don’t really need to worry about this: your camera sorts it all out for you 🙂
What is important is the effect that setting the aperture has on your image as it also controls something called the Depth of Field. We’ll look at that in a moment.
First though, photographers really like to confuse things by referring to apertures as ‘f’ numbers, the values of which are taken from a very weird looking sequence. The most common values being…
| Larger aperture | Smaller aperture | |||||
| f/2.8 | f/4 | f/5.6 | f/8 | f/11 | f/16 | f/22 |
| Narrow Depth of Field | Wide Depth of Field |
What is Depth of Field (DoF) and why is it important?
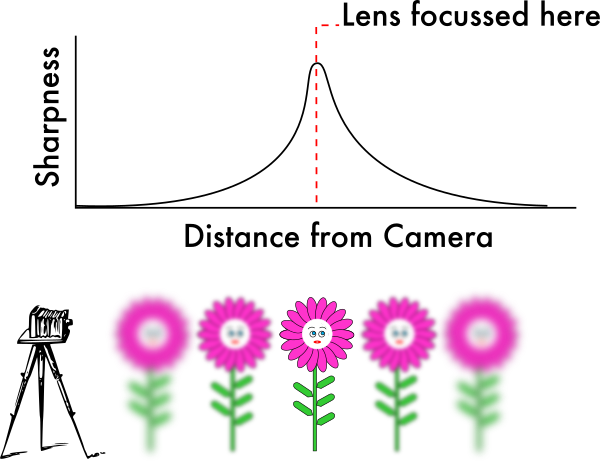
When you focus your lens on the subject, you’re actually setting the lens to focus on everything a specific distance from the camera. Objects that are closer to or further away from the camera will appear less sharp than those at the focus distance.
Depth of Field is the term that refers to how much of the image appears sharp in front of and behind the distance the lens is focused to.

The first graph shows a narrow depth of field as a result of selecting a wide aperture such as f/2.8. Notice how everything at the focus distance appears sharp and ‘in focus’ whereas objects closer to and farther from the camera are blurred and appear out of focus?
This narrow band of sharpness at the focus distance is called a ‘Shallow Depth of Field’

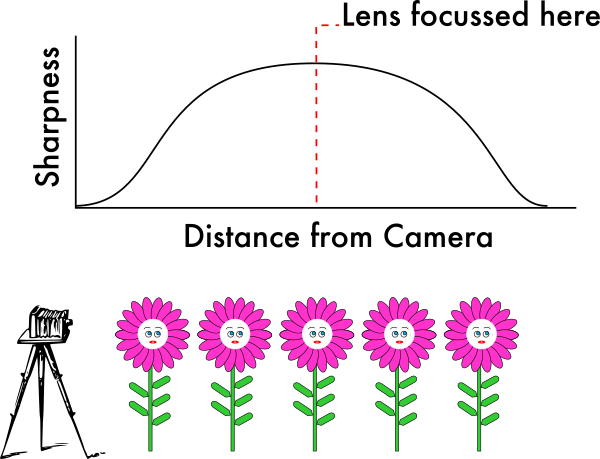
Now let’s look at another example, this time with a wide DoF, caused by setting a small aperture such as f/22. Much more of the scene appears sharp as highlighted in the images below.


Think of f-numbers as referring to Depth of Field, not aperture. The smaller the number, the shallower the DoF #protip Share on X
Try it yourself…
Experimenting with Depth of Field is very easy to do. All you need is somewhere with good light, a flat surface such as a table top and a handful of small(ish) objects. Chess pieces are ideal for this. Place the objects in a straight line along the length of the table, starting at one end with about 2cm or 1″ between them. Go to the end of the table with your camera, set aperture priority mode with the widest aperture your lens allows (smallest f-number), focus on one of the objects about 1/4 or 1/3 or the way along the line and make an image. Now set a smaller aperture such as f/11 or f/16, focus on the same object and make a second image — you may need to increase the ISO.
Now compare the two images you made. Can you see the difference?
A note about sharpness…
Depth of Field and sharpness are not the same thing!
Don’t fall into the trap of thinking that to get a sharper image you need to set an aperture of f/22 or smaller. It doesn’t work that way. Yes, f/22 will give you a wide Depth of Field but the resulting image will likely be less sharp than if you used a middle aperture such as f/8.
Why is this?
Most lenses are ground to be sharpest at an aperture of f/8. It varies slightly from manufacturer to manufacturer but they won’t be far off f/8. Lens sharpness then degrades slightly as you move further from f/8 towards the extremes of f/2.8 (or larger) and f/22 (or smaller).
This is where professional grade lenses start to prove their worth. They’re much sharper at f/8 and as a result their performance is better at the extremities too. That doesn’t mean you need to rush out and buy a professional lens, you just need to be aware of the operating performance of your existing equipment and use it within that range.
Pop Quiz: Which aperture should you use…?
Test your understanding of aperture priority with this simple quiz. Feel free to leave your answers in a comment and I’ll let you know if you’re right.
Scenario 1: Which aperture would you use to photograph a flower?
You want to photograph a flower and have the flower sharp but the background out of focus. Which aperture would you use and why?
Scenario 2: Which aperture would you use to photograph your partner against a neutral background?
Your partner is a 1-2 metres in front of a plain, neutral background. You want to make a quick portrait where their whole face is sharp. Which aperture would you use and why?
Scenario 3: Which aperture would you use to photograph your partner against a cluttered background?
Similar to scenario 2 but this time the background is cluttered and distracting.Which aperture would you use and why? What else could you do to improve the image?
Scenario 4: Which aperture would you use to photograph a beautiful view?
You’re looking at a beautiful view from a viewpoint on top of a hill. There is no foreground to speak of. Which aperture would you use and why? How could you add a sense of scale?
Scenario 5: Which aperture would you use to photograph a beautiful view, keeping everything from the foreground to the horizon sharp?
You’re looking at another beautiful view along the bottom of a valley towards the mountains in the distance. There is an interesting log that leads the eye into the image. Which aperture would you use to photograph the scene and why? Where would you place the camera?
When to use Aperture Priority
As I mentioned above, aperture priority is your ‘go to’ mode for most situations. It’s very flexible and very easy to use whilst offering you more control than the fully automatic modes. Use it anywhere and everywhere except these situations:
- You want to introduce motion blur (subject or background), e.g.
- panning shots
- moving water
- You need to freeze action, e.g.
- (fast) moving subjects
- sporting events
- water splashes
- Working with flash
- You need full control of your camera’s settings
Note: you can use aperture priority in all of these situations, it’s just much easier and quicker to use another mode instead.
Wrapping it all up…
Aperture Priority is your ‘go to’ mode for nearly all your photographs.
It allows you to dial in the depth of field you want by changing the aperture (f-number) and the camera works out the shutter speed for you to give you a good exposure. F-numbers are easier to use if you think of them as controlling the Depth of Field: the small the number, the narrower the DoF and vice versa. The numbers don’t mean anything if you think of them like this other than “f/4 gives you more depth of field than f/2.8” and “f/11 gives you less DoF than f/22”
If you’ve made it this far, well done! I’ve tried to make this article as simple as possible as it’s aimed at a complete novice. If you’ve found something of use, no matter how small, please leave a comment and let me know — the feedback is always useful. Alternatively, I’d really love a share on your favourite social media network.
Thanks in advance,
Prof. Pixel


