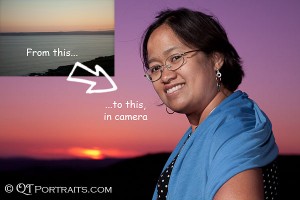
Last year on holiday the sunsets were absolutely fantastic. This year they were nothing to speak of, mainly down to the lack of clouds. Nevertheless, with a little creative thought it is still possible to make a great sunset portrait without resorting to Photoshop.
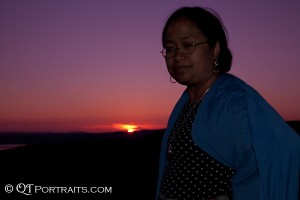
Take this image for example. The inset is the true representation of the scene but by bending the colours of the background you can create a cool portrait, in camera. Granted you can achieve the same in Photoshop, and indeed I’m not averse to that, but as this is so easy to do at the point of capture it makes sense to avoid having to manipulate if after the fact.
The secret to this image is to get the camera to change the colours in the background for you whilst leaving those in the foreground untouched. Sound complicated? Believe it or not it is incredibly simple and only takes a couple of minutes to do.
Overview

To create this shot I used a slight modification to the “Popping a little flash” tutorial. The procedure is very much the same apart from the addition of a couple of gels. Not to the camera, but rather to the flash.The reason for this was to convert the light from the flash guns to green, similart to that emitted from a flourescent tube. By setting the white balance on the camera to flourescent the camera will add a magenta shift to the colours it sees. The result is that the areas lit by the flash will then appear colour correct and the areas not lit by the flash will appear to have had a magenta filter applied.
The result is this image: the subject is lit by the flash and gets colour adjusted to normal. The background (i.e. the sunset) is lit by the ambient and therefore has the magenta shift applied, intensifying the sunset.
I also added an additional light, also gelled to the same colour, to act as the fill because the ambient was so low.
Equipment
To get this shot I used two flash guns. The first was mounted in the hot-shoe to act as an on-axis fill and the second on a light stand and triggered remotely by a Pocket Wizard. You could equally use a wired solution to trigger the flash but be careful not to pull the light stand over.
I also used a Rosco Plusgreen gel on each flash too. This filter is available in the Rosco Strobist filter collection and comes pre-cut to the size of most speedlites.
Step 1 – Colour balance calibration

In the overview above I told a little white lie insofar as the colour balance was concerned. Rather than use the flourescent white balance setting I prefer to use a custom white balance. I’ve found that this gives me far better results overall because I’m able to balance the colour according to the gel on the flash rather than an average of flourescent tubes that is built into the camera. If you don’t have the ability or knowledge to create a custom white balance setting I’d suggest using the flourescent setting instead but be aware that you may need to tweak the colours in Photoshop afterwards.
To calibrate the white balance to the gel, attach the gel to a hot-shoe mounted flash. I used the 580exII and trapped the gel under the diffuser panel. The 580exII was on ETTL and teh 5DmkII was set to daylight white balance. I pointed the camera at a white wall and took a shot. As you would expect, the camera “saw” the white wall as green.

Use the camera’s settings to create a custom white balance. It’s always a good idea to check the white balance setting. To do this, repeat the above shot. The white wall will now appear grey.
Why grey and not white? Beacuse the meter will try to expose the image for 18% greay. To get white you would need to overexpose the shot but as we’re only interested in colour shifts grey is fine.
Note that if you don’t see a grey image it may be down to light contamination from another source, e.g. an incandescent lamp in the room.
Step 2 – Setting the base exposure
If you’re using flourescent WB rather than the custom WB we created above, you can use that setting on the camera. Results should be similar to those shown here.
To make the subject pop against the sunset, we’re going to dial down the ambient and then expose the subject with the flash this is identical to the procedure described in the “Popping a little flash” tutorial.
With the camera set to Manual and the flash guns off, dial in the ISO and set the shutter speed to the camera’s synch. speed. I used ISO100 and 1/200th. Metering for the sky gave an aperture of f/4. This produced a dull and uninspiring base image like this.
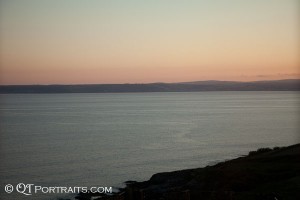
Changing the camera to use our custom WB setting instead gives something a little more interesting but still missing something…
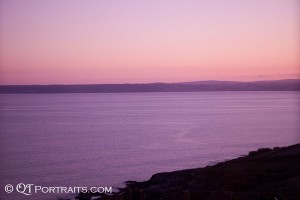
Comparing the above two images is a great way to see the effect of bending the colour in-camera using the custom white balance setting we made earlier. It’s still definitely missing something so cue Mrs. LightMatters.
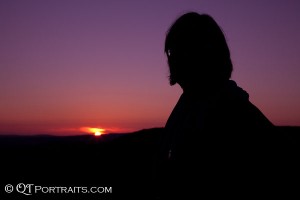
Bringing Mrs. LightMatters in and recomposing the shot we end up with this image. Note that the exposure has changed from f/4 to f/11 because I’m now looking at a much brighter area of the sky that includes the sun and I want to underexpose the shot by about 2 f-stops.
Thinks to look at:
Background exposure – do you like it? Is it too bright or too dark? If so make adjustments accordingly. You can also see how dramatic the magenta shift is now that we’re underexposing the background and therefore increasing the colour saturation.
Foreground – For this exposure we have a complete silhouette of the subject. Therefore we cannot rely on the ambient to porvide any fill but rather will require a separate light.
Step 3 – Adding the fill
For this shot I used a hot-shoe mounted, gelled 580exII to provide the fill light. It was similarly gelled with a Rosco Plusgreen gel and set to Manual mode.
Flash power was set to probably about 1/16th or 1/8th. The setting is largely unimportant as it will need to be adjusted to suit the subject, the density of the gel, flash to subject distance and the contribution of the ambient. The important thing is to set the fill to give a small amount of illumination to the subject, to bring up the shadow detail.
Whatever you set the fill to, this will be as dark as that part of the subject gets. Adding the key light will only increase the illumination on the subject.
It’s also worth pointing out here that the fill-key combination will give total control over the light on the subject. The ambient doesn’t play a part as our base exposure we set in step 2 renders her as a silhouette.
Step 4 – Key light

We’re now ready to add the key light. For this I used another 580exII on a Manfrotto Nano 5001B stand. This light was similarly gelled with a Rosco Plusgreen filter and triggered with a PocketWizard FlexTT5 transceiver, the transmitter being the MiniTT1 on the hot-shoe between the camera and the fill light.
The key was placed a few feet from the subject at about 45° and just higher than her head pointing slightly down. The speedlite was also set to Manual and I adjusted the flash output up and down until I got the subject illumination about right.
Step 5 – Go and try it yourself
Seriously! There is no substitute for experience and once you’ve tried this out a few times it will become second nature.
Summary
When you look at it, this is a very simple and easy to use technique. It sounds complicated but believe me, it isn’t. It’s also one of those little things that can be used to set you apart from everyone else.
This was the first time I’d tried out this technique and I’m really pleased with the results. As ever though I know I can do better than this so will be pushing the limit once more on the next outing.
Acknowledgements
I first read about this technique on David Hobby’s excellent blog, http://strobist.com



[…] This post was mentioned on Twitter by . said: […]
[…] social_url = 'https://theLightMatters.com/?p=646'; As I was capturing the images for my post on Bending colours to make a sunset sizzle I realised that there are a couple of flaws with this […]