

How to remember camera settings (or not with this sneaky workflow)
Do you struggle to remember camera settings?
Are you frightened of changing a camera setting in case you muck something up?
Do you wish there was an easy way to set your camera up for any situation?
If you can relate to any of these question, I’ve written this post for you. So if you read it and find just one thing useful, please take a minute to leave a comment below and let me know 🙂
One of the most common questions I’m asked is “How do you remember your camera settings?”
The truth is, I don’t. I use a quick sequence to dial in the correct camera settings for each scene. It takes but a few seconds to run through and works like a charm every time.
Camera settings workflow…
The camera setting workflow I use is extremely simple having just four steps:
- Set the White Balance
- Set the ISO
- Set the Mode
- Set your Aperture or Shutter Speed accordingly
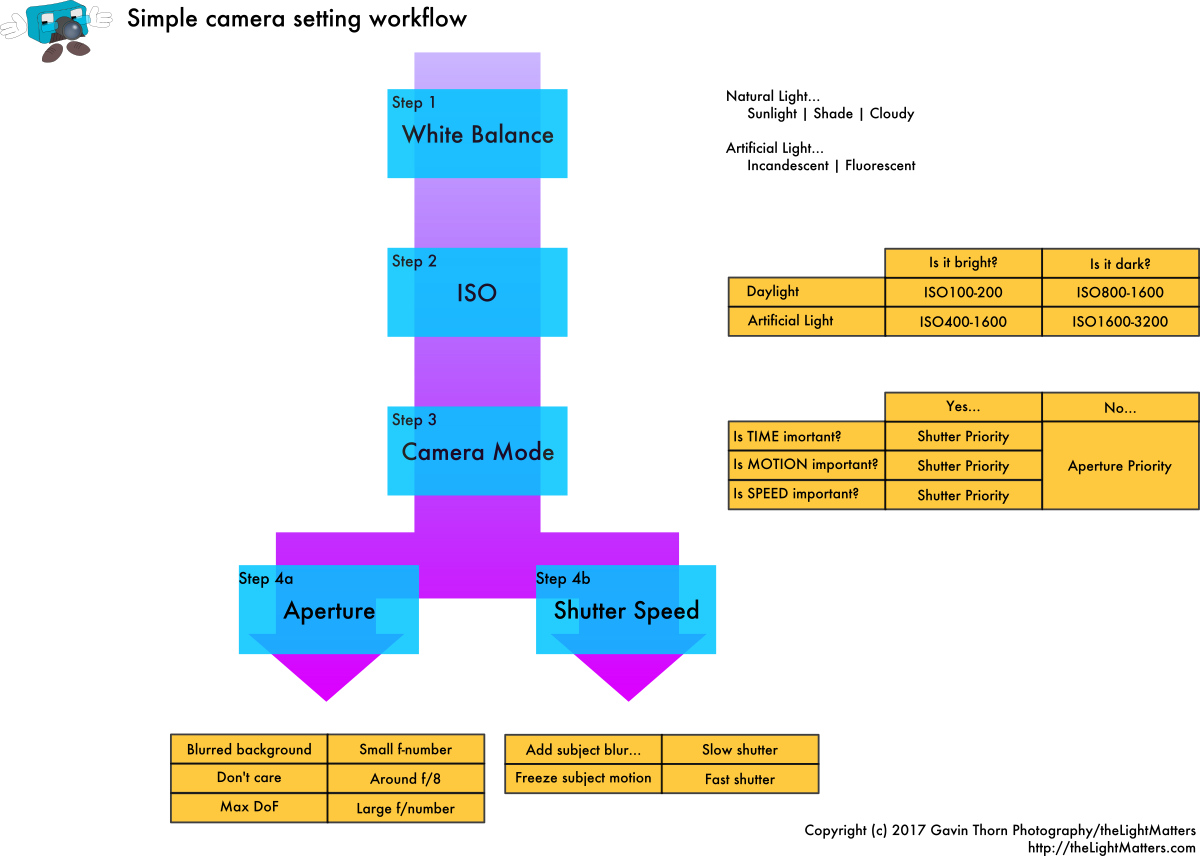
It takes seconds to set the camera up as I move from one scenario to another and there’s no need to remember any specific settings.
Camera settings in detail…
Step 1 – White Balance (WB)
White Balance is only relevant with digital cameras. (Does anyone remember the days of Daylight and Tungsten balanced film?)
It’s function is to tell the camera how to process the colours in the scene. (If you want to know more about why this is important, I’ve written an article, here: http://thelightmatters.com/techniques/how-to-take-better-pictures-getting-great-colour-with-white-balance/)
Look at the scene you’ll be photographing. What’s the predominant light source?
If you’re outside, is it…
| If you’re inside, is it…
|
To get good colour it’s really important to know this so you can set your White Balance accordingly.
Look for the WB setting on your camera. Set it by choosing the icon that looks most like the predominant light source in your scene. Once you’re done, skip to Step 2 below.
A note about using Auto White Balance…
Personally, I hate Auto White Balance and have rarely used it in over a decade. I find every time I use this setting all my images look dull and flat with an odd, grey colour cast.
Yes, it’s possible to fix in post processing but, this article is about setting your camera up so you don’t need to.
Special note for power users…
White Balance on most modern digital cameras also includes special settings for creating a custom white balance setting, setting a Kelvin value and studio flash. These settings are beyond the scope of this article. If you would like to know more about how and when to use them, leave a comment below and let me know.
Step 2 – ISO
ISO adjusts the sensitivity of your camera to light. For darker scenes, your camera needs to be more sensitive to light than for bright scenes.
BUT, there is a cost: the more sensitive you make your camera to light, the more noise you’ll see in the photo. It’s a bit like turning the volume up on a very quiet track. The more you turn the volume up, the more distorted the music sounds.
The general rule of thumb is:
Keep your ISO as low as you can without compromising your ability to capture the scene.
Survey the scene and use this table as a starting guide.
| Bright Scene | Dark Scene | |
Daylight | ISO100-200 | ISO800-1600 |
Artificial light | ISO400-1600 | ISO1600-3200 |
You may need to adjust the values up or down according to your specific circumstance, your equipment’s performance and the amount of image degradation you’re happy with in your images.
Artificial light is particularly deceptive. Our eyes are very good at compensating for bright/dark conditions so to us artificial light appears much brighter than it really is, hence the higher settings.
Remember: A noisy image can be treated in post production, a blurred image cannot.
A note about using Auto ISO…
Auto ISO sounds good in theory but this is another feature I never use. Why? Because I want to be in control and keep the ISO setting as low as I can. My personal preference is to trade off aperture and shutter speed to keep the ISO low.
Special note for power users…
Changing the ISO setting on the camera does not change the sensitivity of the sensor. It changes how much the analogue signal from the sensor is amplified before it’s converted to digital data for processing.
Step 3 – Camera Mode
99.999% of the time you want to choose Aperture Priority! (Canon: Av, Nikon: A)
The only other options I recommend you consider are Shutter Priority (Canon: Tv, Nikon: S) and Manual (M).
Don’t ever use Programme (P) mode — If you want to know why, leave a comment below and if there’s enough interest I’ll write an article on how it works and why it’s a bad idea.
Choosing the best mode for your image…
Always choose Aperture Priority (Av or A) unless time is important in your image. If it is, choose Shutter Priority (Tv or S) instead.
These are typical scenarios where you might want to use Shutter Priority rather than Aperture Priority…
Scenario | Typical examples |
You want to show subject motion by using a slow shutter speed |
|
| You want to freeze subject motion by using a fast shutter speed |
|
I’m sure there are other too. If you can think of one, let me know 🙂
When to choose Manual mode (M)
I choose Manual mode when I need to be very deliberate and have complete control over what the camera is doing at all times. Examples are…
- working with studio flash
- stage shows with artificial lighting (such as theatrical performances and fashion shows)
- sporting events held inside with very even lighting and flash isn’t allowed (my daughter’s ice hockey matches are a great example of this)
Step 4 – Choosing your Aperture and/or Shutter Speed
The beauty of working in Aperture or Shutter priority is that they’re semi-automatic modes. They allow you to select one parameter (aperture or shutter speed) and the camera works out the other (shutter speed or aperture respectively) to give you the correct exposure.
Please note these are just general rules of thumb to get you in the right ballpark and I’d really encourage you to experiment and play around with these camera settings to understand the differences.
How to choose the correct Aperture
When you work in aperture priority, as you select the aperture (f-number), the camera will calculate the correct shutter speed for you.
Choose your aperture setting based on how much of the image you want to be in focus in front and behind where you’re focusing (aka Depth of Field or DoF).
If you’re making a portrait and want a blurred background, choose a lower f-number in the f/1.2 to f/2.8 range, possibly even f/4.
If you want a really crisp image and you’re not too worried about depth of field, choose something around f/8.
If you’re making a landscape image and want as much of the scene in focus as possible, choose a higher f-number such as f/16, f/22 or higher if your lens supports it.
How to choose the correct Shutter Speed
When you work in shutter priority, as you select your shutter speed, the camera will calculate the correct aperture (f-number) for you.
Choose your shutter speed based on the speed and motion of the subject.
To freeze a fast moving vehicle, choose a fast shutter (e.g. 1/500th, 1/1000th, 1/2000th or faster)
To pan with the camera, freezing the subject and blurring the background, choose a slow shutter (e.g. 1/80th, 1/50th, 1/40th or slower but remember, the slower you go the harder it is to control the motion and reduce camera shake).
To blur water in a waterfall or river you’ll need something in the range of 1s to 5s depending on how fast the water is moving.
For light trails you’ll need a shutter speed around 5s to 20s and again this depends on how fast the subject is moving.
For cloud motion and star trails you could need anything from 30 minutes or several hours respectively.
Conclusion
If you’ve struggled to remember your camera settings in the past, I really hope this post helps. As I said right at the very beginning, I don’t really remember the settings as such, I just follow the same 4-step sequence every time. To me it seems logical to just dial it in according to what I’m photographing at the time whether it be a fashion model in the studio, a car on a racetrack or clouds scudding across the sky over a lake somewhere.
If you’ve learned something from this article, please let me know by leaving a comment below. Why not share it with your friends and followers on social media too?

great article, helps a lot.
and YES: I would like to know, why P is a bad choice!
Never realized white balance was so important. Thanks – will try it out.
It makes a huge difference. Leaving it on ‘auto’ as most people or do means you’re relying on the camera’s software to make the decision for you. Trouble is, the camera can’t interpret the scene the same way as the human eye.
Good colour makes a huge difference to the finished images as this post explains: https://thelightmatters.com/techniques/how-to-take-better-pictures-getting-great-colour-with-white-balance/
Thanks….Great article..
I will try it out…
Let me know how you get on Faizal.
Have a great day 🙂
I would like to know about P as well!
Program or P mode isn’t a good one to use in my opinion. It tries to simplify setting the exposure by using a pre-programmed algorithm. Very simply it chooses the widest aperture it can for your chosen ISO then selects the shutter speed.
Personally I prefer to have much more control over the aperture as it has the biggest effect on my images unless I specifically want to incorporate a time component (eg with a long exposure, motion blur or panning shot).
My advice? If you really want to give it a try, go ahead. As the photographer it’s your choice how you set every shot up and nobody else’s. See how you get on with it. Don’t forget the meter doesn’t always get it right so you may need to compensate from time to time.
BR,
Gavin
This is an amazingly helpful article! I’ve had this Canon for years and have always struggled to remember what’s what and why and when, and end up doing auto for everything. This quick reference will help me to remember, to perhaps enable me to – hopefully – improve my photos and try new ones. Thank you SO, so much!
Thanks for such a lovely comment. Really glad you found it useful and hope it helps in the future.
Have a great weekend,
Gavin