Pure white backgrounds are very much in fashion at the moment. Why? Because…
- …it’s easy to set up and gives a clean image
- …it lends itself very well to most websites
- …you don’t need an expensive set, a white-ish wall will do in many cases
- …if done properly it gives an automatic cut-out in the camera, saving time in post later
- …the white background doesn’t distract from the subject
In particular, photographers love it because it is so simple to set up. When perfected it gives a beautifully, clean image like the one below.

Pure white is a core skill that every photographer needs to master.
Equipment
For best results you will need to use flash lighting, ideally with 3 or 4 heads. This post covers how to use a 3-lit setup. If you have 4, the fourth can be used as a second light on the subject if so desired. It can be done using hot lights but this is something I’ve never tried. I tend to favour either studio lights or speedlites depending on the occasion and where I am at the time.
Setup
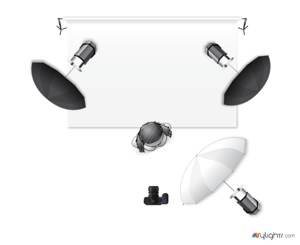
The lighting diagram above shows the basic setup using one key light on the subject and two background lights. The background list are there just to light the background and blow the pixels to pure white. They’ll need to be powered up higher than the key light in order to achieve this so it’s important that no light from the background list falls directly on the subject. You may need to flag them if necessary depending on how much room you have.
To achieve the desired effect the background needs to be about 1.5 stops brighter than the subject.i I usually light my subject to f/8 so the background needs to be set to f/11.5. If the background is too bright it becomes a massive light source in it’s own right causing lens flare and destroying contrast in the image.
Step 1 – set the background lights
I try to keep them roughly the same distance from the background so they’ll be powered to the about the same level. Take an incident light reading across the width of the background and try to adjust the power, position and angle of each light to give a flat reading of f/11.5 across it.
Note, the key light should be turned off until step 3.
Step 2 – position your subject
For best results, you need your subject the right distance from the background so they’re lit to f/8 from behind by the light reflecting off the background.
Stand them in line with the centre of the background with their back towards it. Take an incident light reading from the back of their head. Move them forwards and backwards until you get to f/8.
Step 3 – set the key light
Now turn on adjust the power and position of the key light to give an incident light reading of f/8 when measured at the chin.
That’s all there is to it, now you’re good to go. If you do try this, write a comment and let me know how you got on.